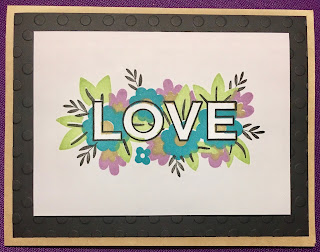
Color Dare #330 - I Heart Us
It is time for another Color Dare! I really love doing these because it challenges me to put colors together that I might not normally think of combining. Today's dare is a Tic-Tac-Toe. If you would like to see the rules or join in on the Color Dare, please click the link below.
First I pulled out my inks pictured above as well as Black and Desert Sand (basically "Kraft" colored). I happen to have these colors in the mini-pads so I am using those today. However, you can buy the regular size of Close To My Heart (CTMH) Lagoon, Sweet Leaf, Thistle, and Black inks. As a substitute for Desert Sand you can now buy Toffee ink which is a good neutral and coordinates well with Kraft paper.
I also gathered together a sheet of White Daisy cardstock, a piece of Black cardstock, a sheet of Kraft cardstock and the Love in Bloom stamp set. I just bought this stamp set and was looking for an opportunity to use it so this Color Dare is just that opportunity!
First I started stamping my layers. I took pictures of each layer so you can follow along with my progression.
Black was easy enough...
Pretty!
Hmmm, not perfect, a bit of overlap, but I'll roll with it...
Ok, let's keep going...
Yes, looking fine...
Nope... I missed, not sure I like this so much...
Then I tried going back and embossing the "LOVE" part with black embossing powder. I think this looks messy. Time to try again...
Let's switch it up this time and make the big flowers Lagoon...
Yes, I'm liking this better...
I'm starting to get the hang of this layering stuff...
Ok...
Yup... I like this better. I hit my target layers better (not perfect, but better).
What do you think? I like the second one the best.
Now that all that stamping is completed I trimmed the stamped cardstock down to 3.25" x 4.5". I want this to be the focus of the card and really "pop".
Next I cut a piece of the Kraft cardstock to 5.5" x 8.5" for the card base. I then cut the black cardstock to 5.25" x 4".
To add a little bit of interest and dimension I ran the piece of black cardstock through my Cricut Cuttlebug inside an embossing folder. I don't believe this exact CTMH embossing folder is available anymore, but there is a Playful Scallops Embossing Folder available that would have been perfect for this card, too.
Before assembling the card I wanted to be sure to finish the back of the card and the inside, too. This also allowed for my ink on the white cardstock to dry completely.
I always "sign" my creations with my initials on the back. For this card I also added a stamp from the This Is Not a Bill stamp set. This card was literally made with "love" both in design (the Love in Bloom stamp set) and the time and love I put into making it.
Because I wanted plenty of room on the inside to write a note I simply used the "Thinking of You" stamp from the Thankful for You stamp and thin cuts set. (BTW: As I type this blog, this beautiful stamp and thin cut set is available at a really amazing sale price! Click my link and you can buy it for only $6.75 ... usually it costs $26.95... while supplies last.)
With all my cutting, stamping, and embossing completed it is time to put all the pieces together! I used a flat adhesive (Tombow Permanent Adhesive) to attach the embossed black cardstock to the kraft cardstock. Then I used some 3-D Foam Tape to attach the white stamped piece to the top of the black embossed cardstock.
Thank you for reading my blog and be sure to leave any questions, ideas, or suggestions in the comment section below.
Happy Paper Crafting,
Rebecca


Well done! This is a beautiful card and your step by step photos are fantastic! Thanks for sharing at Color Dare.
ReplyDeleteI have yet to attempt this stamp set, but you make it look so easy. Beautiful job! Thank you for sharing your creation with us at Color My Heart Color Dare. ♥☕ Miss. Carrie
ReplyDeleteThanks for showing so much of your process of making this card. I love that you picked the colours in the challenge to make this LOVE stamp complete. Thanks for sharing with us at Colour My Heart Colour Dare Challenge. I Hope you can join us again soon.
ReplyDeleteClean and simple and great masking and thanks for sharing your technique. One card is as pretty as the other. Thanks for sharing with us at Color Dare.
ReplyDeleteTHANK YOU so much for showing the results of each stamping layer; your technique is soooo helpful. I got frustrated on my first attempt and have not tried again. Having your gorgeous card and your photos will be a great help. Thanks again!
ReplyDelete