Posts

Showing posts from July, 2019

Squeaked In "Christmas in July"

Image
Welcome to my blog,  Paper Crafting With Rebecca! Well, I made it! I squeaked in a "Christmas in July" card with two days of July left to go! This is a fun and easy card to make. Watch the video, then see the measurements I used to build the card below. You can, of course, refine the measurements based on dies you currently own... or use a circle die... or a heart die... etc. Measurements: The card base is an A2 card size (8.5" x 5.5"... folded in half to be 4.25" x 5.5" side folding). I cut the patterned paper to be 4" x 5.25" then, using a 2.5" square die I cut out the square window in both the base and the patterned paper piece. Hint: Line up the patterned paper onto the card base and secure with a small piece of removable tape BEFORE the die cut, this way the window will line up nicely when you are building your card. The frame to the window is made using 3.5" square die with the 2.5" square die nested carefu
Christmas in July Demolition

Image
Welcome to my blog,  Paper Crafting With Rebecca! Today I posted a very different video than I usually share, so if this is your first time to my YouTube channel you will definitely want to check out my other videos to see what type of content I normally create. But I simply had to share this story with you... My "craft room" is really just a space I have claimed in one side of our unfinished basement. My hubby uses the other side of the basement for his workout weightlifting room.  Back when we first bought our house we cleaned up the basement and then we created my little craft area. I started small with a worktable and a few supplies. You may notice that behind my table are three large mirrors.  We found those mirrors leaning against the wall with a lot of junk in our basement when we first moved in.  As a logical storage option my hubby hung the mirrors on the unfinished framed-out wall simply so they would not get knocked over and broken.

Tips and Tricks for July 2019

Image
Welcome to my blog,  Paper Crafting With Rebecca! Today I made a video, the first in what I hope will become a monthly series, sharing some fun "tips and tricks" in paper crafting. Please watch the video and then tell me, in the comments below, if you already do any of these tricks or if you found this video helpful. Be sure to share any suggestions or tips you may have for future videos, too. Here are a few still shots of results seen in the video... Two-tone result Left - one color                  Right - two colors The difference using one color versus two color. Making the stamp your own... Coordinating the envelope. Thank you for joining me today. Please do "Like" and "Subscribe" to my YouTube videos so you don't miss the fun! I love reading your comments. Happy Paper Crafting, Rebecca Disclosure Page

Interactive "Busy Box" Card

Image
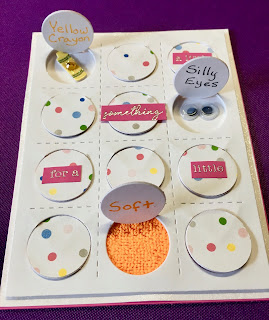
Welcome to my blog,  Paper Crafting With Rebecca! I love making interactive cards because they are fun to make and they are fun to receive! Today I wanted to show you how to make a "busy box" card. This card allows for 12 different surprises for the recipient to discover. I designed this card with our toddler granddaughter in mind... so that meant making a card that can withstand lots of handling. Watch my video below and see how I did it! Wasn't that fun! Here are some still shots to help you see it better... Busy-box Card She loves "yellow", silly eyes, and to feel soft surfaces. I included other things she likes, too! It's never too early to start on Halloween cards! Spooky surprises under each door! The doors stay open by themselves! Thanks for visiting my blog and watching my video! Please be sure to "like" and "subscribe" and remember I love reading your comments!! Happy Paper Crafti

Confessions of a Zip Stripper

Image
Welcome to my blog,  Paper Crafting With Rebecca! Ok... I confess... patterned paper is nice... but oooh those zip strips! I love those unique little strips found at the top of CTMH patterned paper. I made a video showing just one of the many things you can do with zip strips... a boho-chic card. Boho-chic is so fun to create ! You can stick to just a few colors, such as this masculine birthday card. Here is a very simple version using this technique. Here is another example... once you have created the background, have fun with the embellishments! Some of the supplies I used today are listed here... thank you for your support if you choose to purchase from my links... I started by cutting out two pieces of White Daisy Cardstock one for the base 11" x 4.25" another to adhere the zip strips to 4" x 5.25"... once the zip strips are adhered this piece will be cut to 3.75" x 5" I also cut a piece of black cardstock t