Take That Card From Simple to Fabulous
Welcome to Paper Crafting With Rebecca! I hope you find inspiration and helpful paper crafting tips in my blog today. I am not sponsored by, nor an affiliate of, any of the products used in today's blog/video. I am simply sharing this information for creative and entertainment purposes only.
Today's blog and video are all about taking remnants of a card making kit (in this case, a page of card toppers) and turning them into beautiful cards using goodies you have in your own stash. First you will want to watch this video and then I will provide more measurements and details below.
As I mentioned in the video, I sometimes end up with the odd sheet of card toppers. I have nothing else from what, I assume, was once the accompanying paper crafting or card making kit to create the card with. Just the sheet of card toppers! I end up with card toppers because I love buying the boxes of assorted papers/cardstocks that many companies offer in their clearance section. These clearance boxes often include a sheet or two of miscellaneous card toppers. With some imagination and a little creativity you can truly turn these "leftovers" into beautiful works of art.
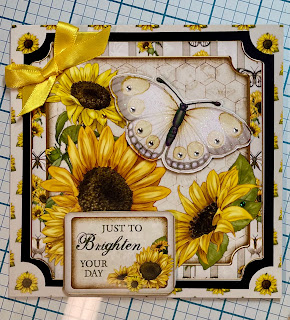
You can keep the process simple, like in my first example, where I simply cut out the card topper, matted it with black cardstock and attached it to a basic 6" x 6" white card base covered with a 6" x 6" patterned paper. I then added some ribbon, a sentiment from the card topper sheet, and the butterfly. I used some Print Magic from the Debbi Moore Selection to add some sparkle to the butterfly. Print Magic, as far as I can tell, is a super fine clear embossing powder with a super fine glitter mixed in. I also added some flat-back rhinestones for added sparkle.
This card, though simple to create, turned out very pretty. However, I find it is also fun to take card toppers and turn them into something fabulous! In my humble opinion, one way to turn a card from simple to fabulous is to change up the card base itself... make it more interesting before ever adding any items to base. As I showed in the video I did just that with the second card! Allow me to provide some measurements in case you would like to make a similar card...
First you will need to cut the card base to be 11" wide by 7" high. Then you will want to score the card base at 3" from the left and then again at 6" from the left. Folding on the score lines will give you a card base that will fit into a 5" x 7" envelope.
For the support strip on the bottom of the card you will want to cut a strip of cardstock that is 11" long. You can decide what width you want to make it. My strip is a floral strip matted onto a solid color piece of cardstock. The solid color piece is 0.75" wide by 11" long. I scored this strip at 5" from the left and again at 8" from the left.
The two vellum pieces are cut 2.75" x 6.75" and 4.75" x 6.75". The solid white cardstock on the inside flap (to write your message to the recipient on) is 2.75" x 6.75".
Of course, the card toppers will vary in size, depending on what you have in your stash. I matted my card topper and the sentiments to match and rounded the corners. I also added sparkle all around the edge of the card toppers using Debbi Moore's Print Magic, but any embossing powder or glitter you already have in your stash would add some "fabulous" to the card, too!
The light green stamping of the daisies on the white cardstock inside the card helped to tie that piece of cardstock into the daisy theme. Lastly, I got generous with the "bling"! Lots of sparkle with rhinestone flowers helped to step this card up to "fabulous" (and helped to hide the adhesive securing the vellum).
I hope this little video and blog will inspire you to use what you have in your stash to create both simple and fabulous cards! Cards are, in my mind, a way to give someone a "paper hug" or to brighten their day. No matter how simple or fabulous you make your card... just make them... and share them to help bring smiles to those around you.
If you have any questions or comments please be sure to leave them for me below. I love hearing from you.
Happy Paper Crafting,
Rebecca


Comments
Post a Comment
Thank you for your comment, I will try to reply as soon as possible.