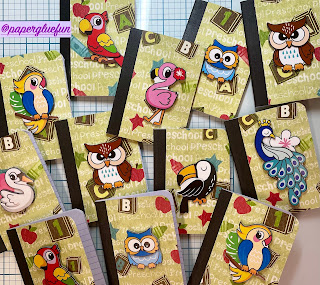
Creating Pre-K Sticker Books
Welcome to Paper Crafting With Rebecca! I am so happy you stopped into my little blog. I hope you find the information here fun, informative, and inspirational. I am not selling anything. I am not sponsored by (nor an affiliate of) any of the products used or companies mentioned in my blog or videos. I simply create this blog (and videos) because I love meeting new people and connecting with others in the paper crafting community.
I have an amazing little pre-schooler in my life (my granddaughter). We have so much fun crafting together. She also likes stickers! The problem with stickers is where do you stick them once you get them? There is always the option of sticking them on your cheek or forehead (we've done that), or on your Daddy's shirt (yup, she's done that), but what if you want to keep the sticker and look at it later? After all, adults generally frown if the stickers are stuck to the living room walls.
Well, after some consideration about this I decided she should have a "sticker collection book" made just her size. In fact, why not make enough that she can give one to all her pre-school friends and then they can trade stickers back and forth!?
So that is where today's fun project comes from. I saw The Posh Paper Lady create some cute little journals and thought I could adapt that basic idea, with a little variation, to create sticker books... so that is what I did. Because I want to be sure to give credit where credit is due... here is the link to the video by The Posh Paper Lady if you want to see her video... The Posh Paper Lady
Grabbing some adorable pre-school themed paper, the mini composition books, and some fun stickers from Dollar Tree I got busy! Here is the video showing you how to make the sticker books...
Now, for those measurements I promised:
The front and back covers are originally cut to 5" x 3". Once adhered to the composition book you will trim off the edges.
The pocket is cut 3.25" x 4". You will fold the top edge of the pocket down 0.25" and the other 3 sides are folded in at 0.5".
I only made one pocket for these books, but you could create two pockets (one for inside the front cover and one for inside the back cover) if you want more pocket storage.
These are a fun and easy project that can be adapted for any age group. I believe the inside pocket adds a lot to the book and opens the book up to more uses.
Let me know if you create some of these. Also, if I left out any information or if you have any questions, please be sure to let me know in the comments below.
Happy Paper Crafting,
Rebecca


Comments
Post a Comment
Thank you for your comment, I will try to reply as soon as possible.