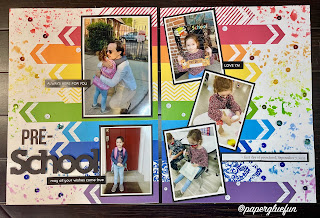
Hand-cut Scrapbook Layout
Welcome to Paper Crafting With Rebecca! I am so happy you stopped into my little blog. I hope you find the information here fun, informative, and inspirational. I am not selling anything. I am not sponsored by (nor an affiliate of) any of the products used or companies mentioned in my blog or videos. I simply create this blog (and videos) because I love meeting new people and connecting with others in the paper crafting community.
Today I wanted to share with you my video (and then some details further down in this blog) about creating a fun and colorful double layout for an 8.5" x 11" scrapbook. You won't need dies or a cutting machine to create this sort of layout because the components can be hand-cut!
As I mentioned in the video, this scrapbook was inspired by Linda at Linda Creates on Instagram. Please be sure to give her some Instagram love and let her know I sent you over. Although my page is similar, her page is a 12" x 12" single layout page done in different colors and with a few different techniques.
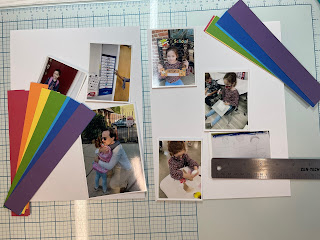
As I mentioned in my video, you will want to start with 2 sheets of 8.5" x 11" white cardstock and then colored cardstock to create your strips. I happened to use rainbow colors, but you can change up the colors however you want to using what you already own in your paper collection. My strips started out as 8.5" x 1.125" (eight and one half inches by one and one eighth inches). I will then cut them down shorter once they are adhered to the white cardstock.
I then created my own patterned paper using stamping on some of the solids. I stamped with VersaMark ink and used white heat embossing powder... but you can use pre-made patterned paper, or create your own with colored inks, or any other number of ideas to create interest to your layout!
Next I cut points on the end of each strip by marking 0.5" up from the end on each side of the strip and locating the middle of the strip, and chopping off the resulting corners. Once you have one done you can use it as a pattern for the rest like I did in the video.
Feeling that the strips needed just a bit more "oomph" I added a white chevron to each one. Again, I used VersaMark ink and white embossing powder for the desired effect I was going for.
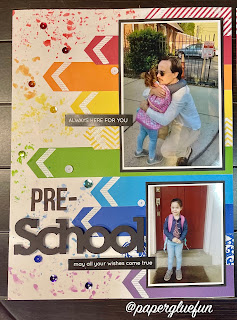
Next I used liquid adhesive to attach all the strips down the page, trimming off the ends I didn't need. The white edges were simply too stark for me, so I decided to use some water based inks and "smoosh" a bit more color onto the page corresponding with the paper strips.
The pictures are matted in black, so I used black sentiments and a black title to help ground the page a bit. As I explained and demonstrated in the video, I believe it is always a good idea to darken the foam tape when using a black mat on your photos or sentiments printed on black.
Lastly, I added some sequins to give the layout a little more interest and balance. Aside from the sequins, because of the smooshed inking, I didn't feel like the page needed anymore embellishing... however, you can always add more embellishments to your page if you have them!

Comments
Post a Comment
Thank you for your comment, I will try to reply as soon as possible.